Showing posts with label simon says stamp. Show all posts

Wednesday, September 27, 2017

Video Tutorial - MFT and Simon Says Stamp - Watercoloring a fun Halloween Scene on your Card

Hi everyone!  I have a new card and video up today combining some stamps from My Favorite Things and Simon Says stamp.  I water colored a galaxy/starry night sky background and the grass with my Gansai Tambi watercolor paints.  I also painted the images with my Zig Markers and a water brush.  You can view the video here:

And here are some pictures of my card:
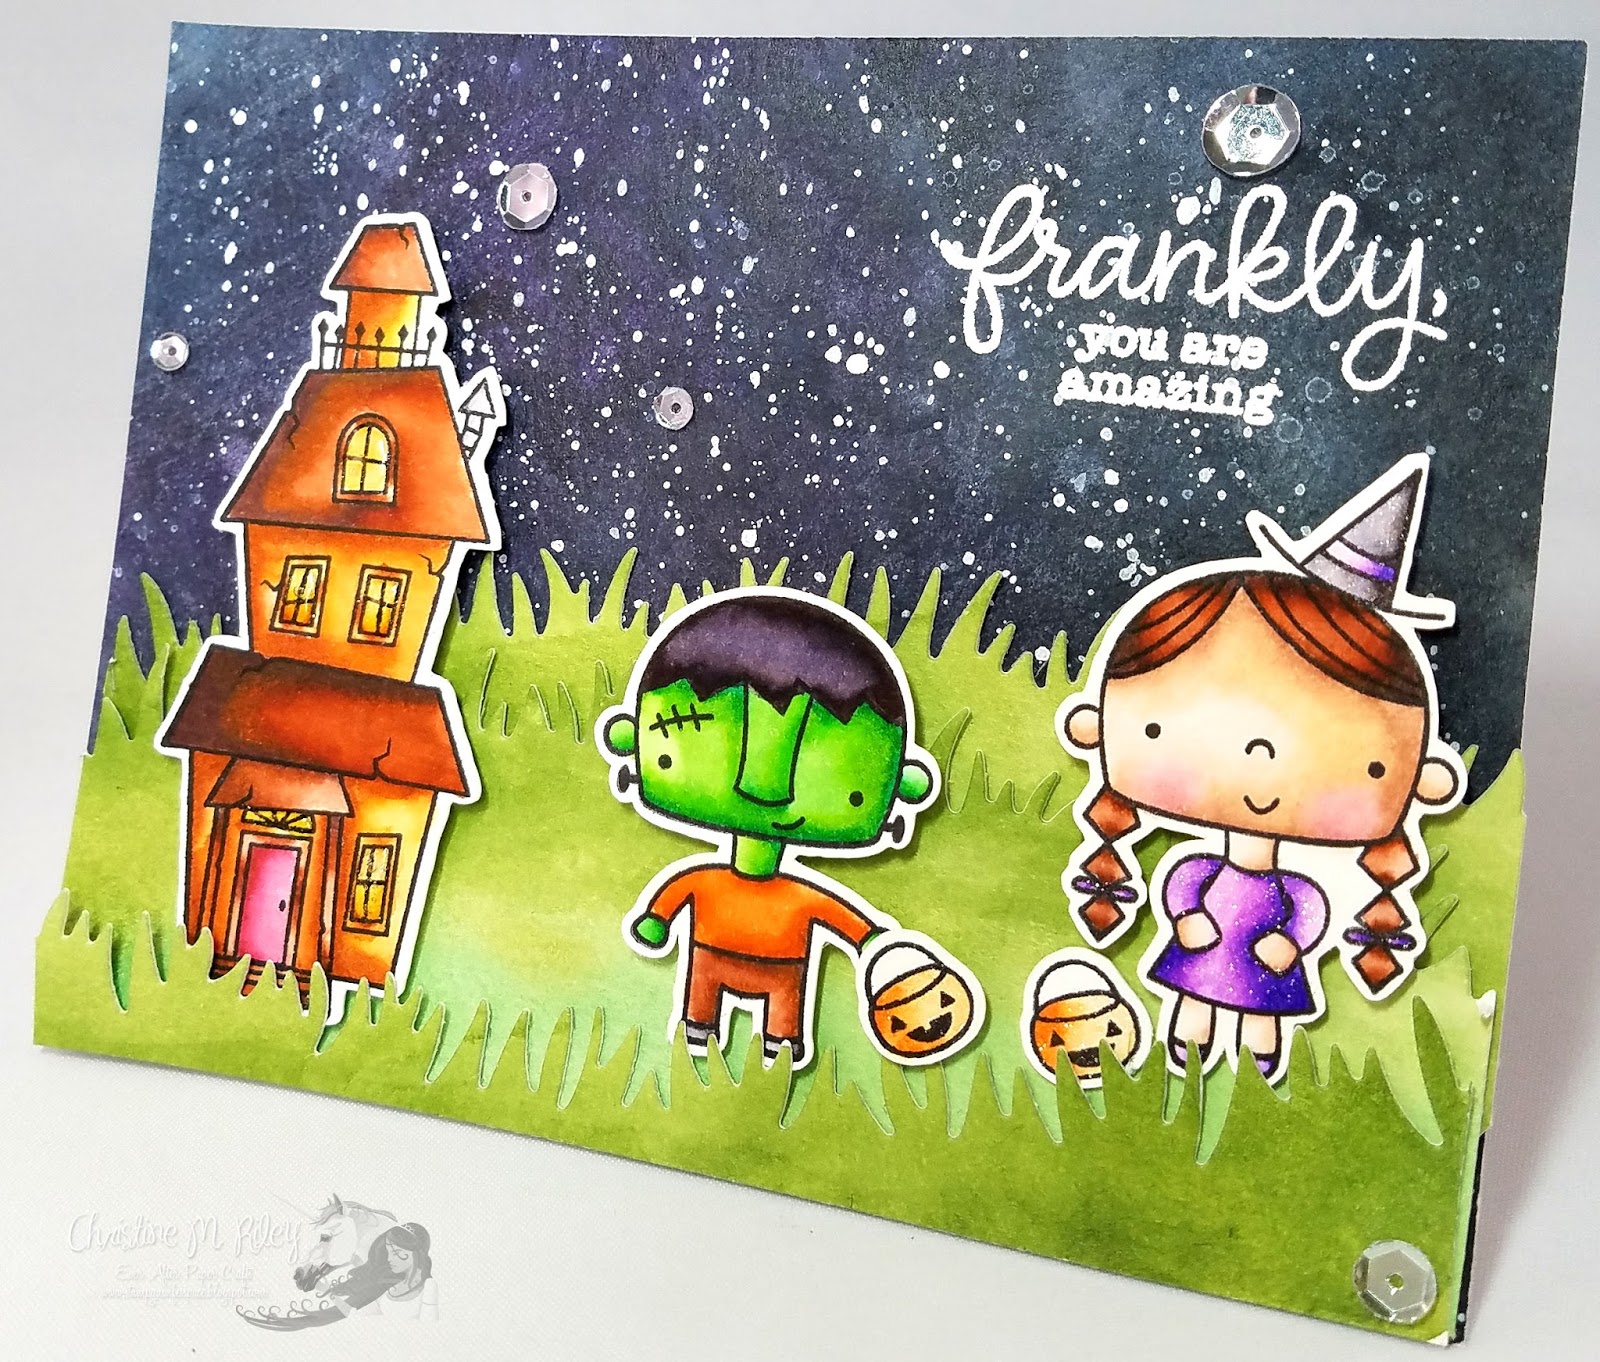


For the Witch, I used the following Zig markers:
Hat: Black, Violet
Hair: Brown, Dark Brown
Dress: Violet, Light Violet
Shoes: Violet
For the pumpkin trick or treat baskets, I just used Orange
For Frankenstien, I used the following Zig markers:
Skin tone: Green, Light Green
Hair: Black
Shirt: Brown, Orange
Shoes: Black
Pants: Brown, Dark Brown
For the spooky house, I used the following Zig Markers:
Roofs: Dark Brown, Brown
Base of House: Brown, Light Brown
Inside Windows: Orange, Yellow
Door: Deep red
Exhaust Pipe: Gray, Light Gray

I used my Lawn Fawn Simple Grassy Hillside dies to cut out the grass.  I adhered everything to the card base with foam tape and also white heat embossed the sentiment.  What do you think?

Well, that's it from me today.  Thanks so much as always for stopping by.  Huge hugs!

Sunday, July 23, 2017

Video Tutorial - How to Create a Fun Summery Card from the July 2017 Simon Says Stamp Card Kit

Hi everyone!  I have a fun video to share with you today showing how I created this super fun summer card from the July 2017 Simon Says Stamp card kit.  Here's my video:

And here are some pictures of the card:


Thank you so much as always for stopping by and I'll catch you in the next video :)  Hugs!


Sunday, July 16, 2017

Video Tutorial - W Plus 9 Modern Peonies - Stencil Background and Watercoloring with Zigs

Hi everyone!  I hope you are having a wonderful day!  I have a new card and video tutorial to share with you today.  In this video, I share how I created a fun background using a stencil and some distress inks and I also share how I water colored the floral images using my Zig markers and a water brush.  Here's my video:

And here are some photos:


I used a stencil from Simon Says Stamp called Circular Lace and Worn Lipstick and Picked Raspberry Distress Inks to create the background.  I colored the middle Peony with Light Pink and Pink Zigs, the peony on the right with Light Pink and Pink, and the Peony on the left with Peach Pink and Orange. All leaves and stems were colored with Olive Green.  I added some Morning Dew Nuvo Drops on some of the petals and some sequins from my stash. 


I hope you enjoy the video and the card.  Thanks so much as always for stopping by!


Thursday, June 8, 2017

Video Tutorial + Giveaway - Using Fine Tec Watercolors with Simon Says Stamp Floral Bliss Stamp Set

Hi everyone!  I have a fun video tutorial to share with you today using the brand new Floral Bliss stamp set from Simon Says Stamp and Fine Tec Pearlescent Watercolor paints.  Here's my video:

And here are some pictures:


I first stamped the gorgeous floral image onto black cardstock using Versamark ink.  I then embossed the image with gold embossing powder.  I then used my Silver Round Size 4 paint brush and my Fine Tec Pearlescent paints to color the image.  I then heat embossed the sentiment with gold embossing powder, added a strip of gold glimmer paper (from Stampin' Up) and added some design paper from a Recollections paper pad.  I also added some sequins from my stash.  What do you think?


I also have a giveaway going on.  This brand new Floral Bliss stamp set can be yours!


All you have to do to be entered is to subscribe to my YouTube channel and leave a comment on this video.  The video is linked above, or you can click here: https://www.youtube.com/watch?v=tn28KX9cWRQ.  Thanks so much for watching and for stopping by and I'll catch you in the next video :)

Monday, June 5, 2017

Video Tutorial - Emboss Resist and Double Embossing Techniques

Hi everyone!  I hope you are all having a wonderful start to your week.  I have a super simple card to share with you today and I did a video tutorial on how I created this card using two techniques: emboss resist and what I call "double embossing."  Here is a link to my video:

And here are some pictures:


The background stamp is the Flora Background stamp from Simon Says Stamp.  I embossed that with white embossing powder, then sponged Distress Oxide Worn Lipstick ink over the image for the emboss resist technique.  The sentiment is from Neat and Tangled's So Lucky stamp set.  I first embossed it with white embossing powder (except for the black, that one I first embossed clear), then embossed it with Taffeta Pink Wow embossing powder.  I added some sequins, and there you have a super simple, but fun and sparkly card.  What do you think?

Well, I hope you enjoyed this simple technique for today.  Thanks so much as always for stopping by.  Have a fabulous day!

Sunday, May 28, 2017

Video Tutorial: Watercolor Tips using Zig markers and Mama Elephant's Organic Blooms Stamp Set

Hi everyone!  I hope you are having a wonderful weekend!  I have a brand new video tutorial and card to share with you today.  In this video, I show you some more tips on how to use your Zig markers to create unique color pallets.  I'm using the new, gorgeous stamp set called Organic Blooms by Mama Elephant.  Here's my video tutorial:


And here are some pictures:


To color the peachy colored flowers, I used Pink, Yellow, and Wine Red.  For the pink flower, I used Light Pink, Pink, and Wine Red.  For the leaves, I used light green and for the blue flowers, I used blue.  For the shadow around the image, I used Light Blue.  I used some gold foil paper from Stampin' Up!  The pink paper was created using the Flora background stamp from Simon Says Stamp and the emboss resist technique.  I'll be doing another video on this technique, but just briefly, I inked the image with Versamark ink, heat embossed it with white embossing powder, then applied Worn Lipstick Distress Oxide ink.  I added some flicks of gold paint from the Gansai Tambi Starry Colors pigment ink set.  I also added some sequins from Lucy's Cards and Studio Katia.  I also coated the flowers with my Wink of Stella clear glitter pen. What do you think?


Well, that's it from eme today.  Thanks so much as always for stopping by and I'll catch you in the next video!

Friday, May 26, 2017

Creating a fun scene with stencils and Simon Says Stamp products

Hi everyone!  I hope you are all having a wonderful day and for my friends in the US, I hope you are having a great start to your Memorial Day weekend!  I have a fun video and card to share with you today using an adorable stamp set from Simon Says Stamp and some other products to create a fun scene on my card.  Here's my video tutorial:

And here are some pictures:


I used my Lawn Fawn Simple Grassy Hillside dies to create the grass. I then used the new Cloud Stencil from My Favorite Things to create the cloud background (I used Broken China Distress Oxide ink). I then stamped all the images from the adorable Some Bunny Special stamp set from Simon Says Stamp with Black Dye ink from Hero Arts. I then colored all of the images using my Zig Clean Color Real Brush markers and a water brush. I used Gray Brown and Peach Pink for the bunny, and brown for the pot he's standing on and Light Green for the grass. I used Gray, Wine Red, and Dark Oatmeal for the mailbox. I used pink, yellow, and light green for the pink flowers and light blue, yellow, and light green for the blue flower. I used orange and light green for the carrots. I also heat embossed my sentiment (also from the same stamp set) with white embossing powder from Simon Says Stamp. Finally, I added some sequins from Pretty Pink Posh (the friendship mix). What do you think? Well, that's it from me today. Thank you all so much as always for stopping by! Big hugs!

Wednesday, May 24, 2017

Video Tutorial: Tips for Using your Zig Markers when coloring a floral scene using Simon Says Stamps products

Hi everyone!  I hope you are all having a fabulous week.  I have a new video tutorial and card to share today using this gorgeous stamp set from Simon Says Stamp called More Spring Flowers.  I love this stamp set, it was so much fun to color these flowers in.  In my video tutorial for today, I show you some tips on how I use my Zig Clean Color Real Brush markers to create multiple colors when coloring flowers.  I also show you how you can use one marker color to get gorgeous shaded results using that marker and a water brush.  Finally, I also show you how I created the distress inked background.  Here's the video tutorial:


And here's some pictures:


I inked all the flowers in Versamark ink and then heat embossed them in white embossing powder.  For the background, I used Picked Raspberry and Mowed Lawn distress inks to create the blended background, then I spritzed the background with some water for a distressed look.  To color my flowers, I used the following Zig marker colors: Pink, Light Pink, Blue Gray, Yellow, Orange, Olive Green, Light Green.  The sentiment is from the Hero Arts You are Loved stamp set.  Twenty-five percent of all proceeds from this stamp set go to the Jennifer McGuire Ink Kindness Campaign, which is such a worthwhile cause.  I stamped the sentiment in Versamark ink and heat embossed it with white embossing powder.  I added all of the elements with foam tape.  I then added some Nuvo Crystal Drops in Morning Dew and Carnation Pink.  I coated all the flowers with Wink of Stella clear glitter.  What do you think?


Well, that's it from me today.  Thank you so much as always for stopping by.  Have a wonderful day!


Thursday, May 18, 2017

Video Tutorial: Notecard Set Using Simon Says Stamp's Funny Food Stamp Set and Distress Oxide Inks

Hi everyone!  I have a super fun set of notecards to share with you today using these super adorable images from Simon Says Stamp.  This stamp set is called Funny Food Stamp Set and it's so adorable.  I created a video tutorial for you.  I'm so sorry, I'm trying to figure out why YouTube is splitting my vidoes into two parts, but for now, I'm just going to go with it :)  Here's Part One:


And Part Two:


Now for some pictures :)


Now for some close ups:


This is the card I created on camera for you guys.  It uses Cracked Pistachio and Worn Lipstick Distress Oxide inks and the image was colored with Zig Markers. 


This one uses Vintage Photo, Walnut Stain, and Worn Lipstick distress inks and the images were colored with Zig Markers.  I added Wink of Stella and Glossy Accents.


This one uses Vintage Photo and Wilted Violet Distress Oxide Inks.  The image was colored with Zig Markers.  I added some jelly and coated it with Wink of Stella and Glossy Accents.


For this card, I used Fossilized Amber and Worn Lipstick distress inks.  The adorable pizza was colored with Zig markers.


For the cute fry guy, I used Worn Lipstick and Fossilized Amber distress oxide inks and colored him with Zig Markers.  Other supplies used are Neenah Dessert Storm cardstock, Early Espresso cardstock from Stampin' Up!, design paper from Stampin' Up, Versamark ink, Chocolate Chip ink from Stampin' Up, and clear embossing powder.  All images were stamped on Bristol Smooth cardstock and then were cut out using the coordinating dies from Simon Says Stamp.


Whew, well that's it from me today.  I hope you enjoyed these notecards.  Thanks so much as always for stopping by. 


Huge Hugs,


Christine


...and they lived happily ever after.
blog design by vk design company
