Good morning Crafty Friends and welcome to Kennedy Grace Creations September Blog Hop! We are so happy you have stopped by and joined us for this very special event.
Our newest release of Stamps and Sequins is now live and available for purchase in the Store. I have a card and video tutorial to share with you for this blog hop. Here's my video:
(To view on YouTube, click HERE)
And here are some pictures of my card:
For my card, I used the gorgeous new release set called Friendship Blessings. This image was a dream to watercolor. I painted it using my Zig Clean Color Real Brush Markers and a water brush. For the petals, I used Pale Rose and Deep Red. I used Yellow for the centers of the flowers and Olive Green for the greenery. Finally, I used Light Blue for the shadow around the image. I also painted my own design paper using my Gansai Tambi watercolor paints. I added some vellum and stamped my sentiment onto it and heat embossed it with black embossing powder. I added some black Nuvo drops and also some Pink Champagne Sequins from Kennedy Grace.
We will be giving away a prize package to one lucky winner.
All you have to do is join us for the hop and leave a comment on each project. The more you comment, the more chances you have to win. The winner will be announced on Monday.
We hope you have enjoyed this release and will hop along to see what our talented designers have made using the Stamps and Sequins from our September release. Your next stop is the lovely and talented Cindy.
In case you miss some along the way, have included the entire hop for you?
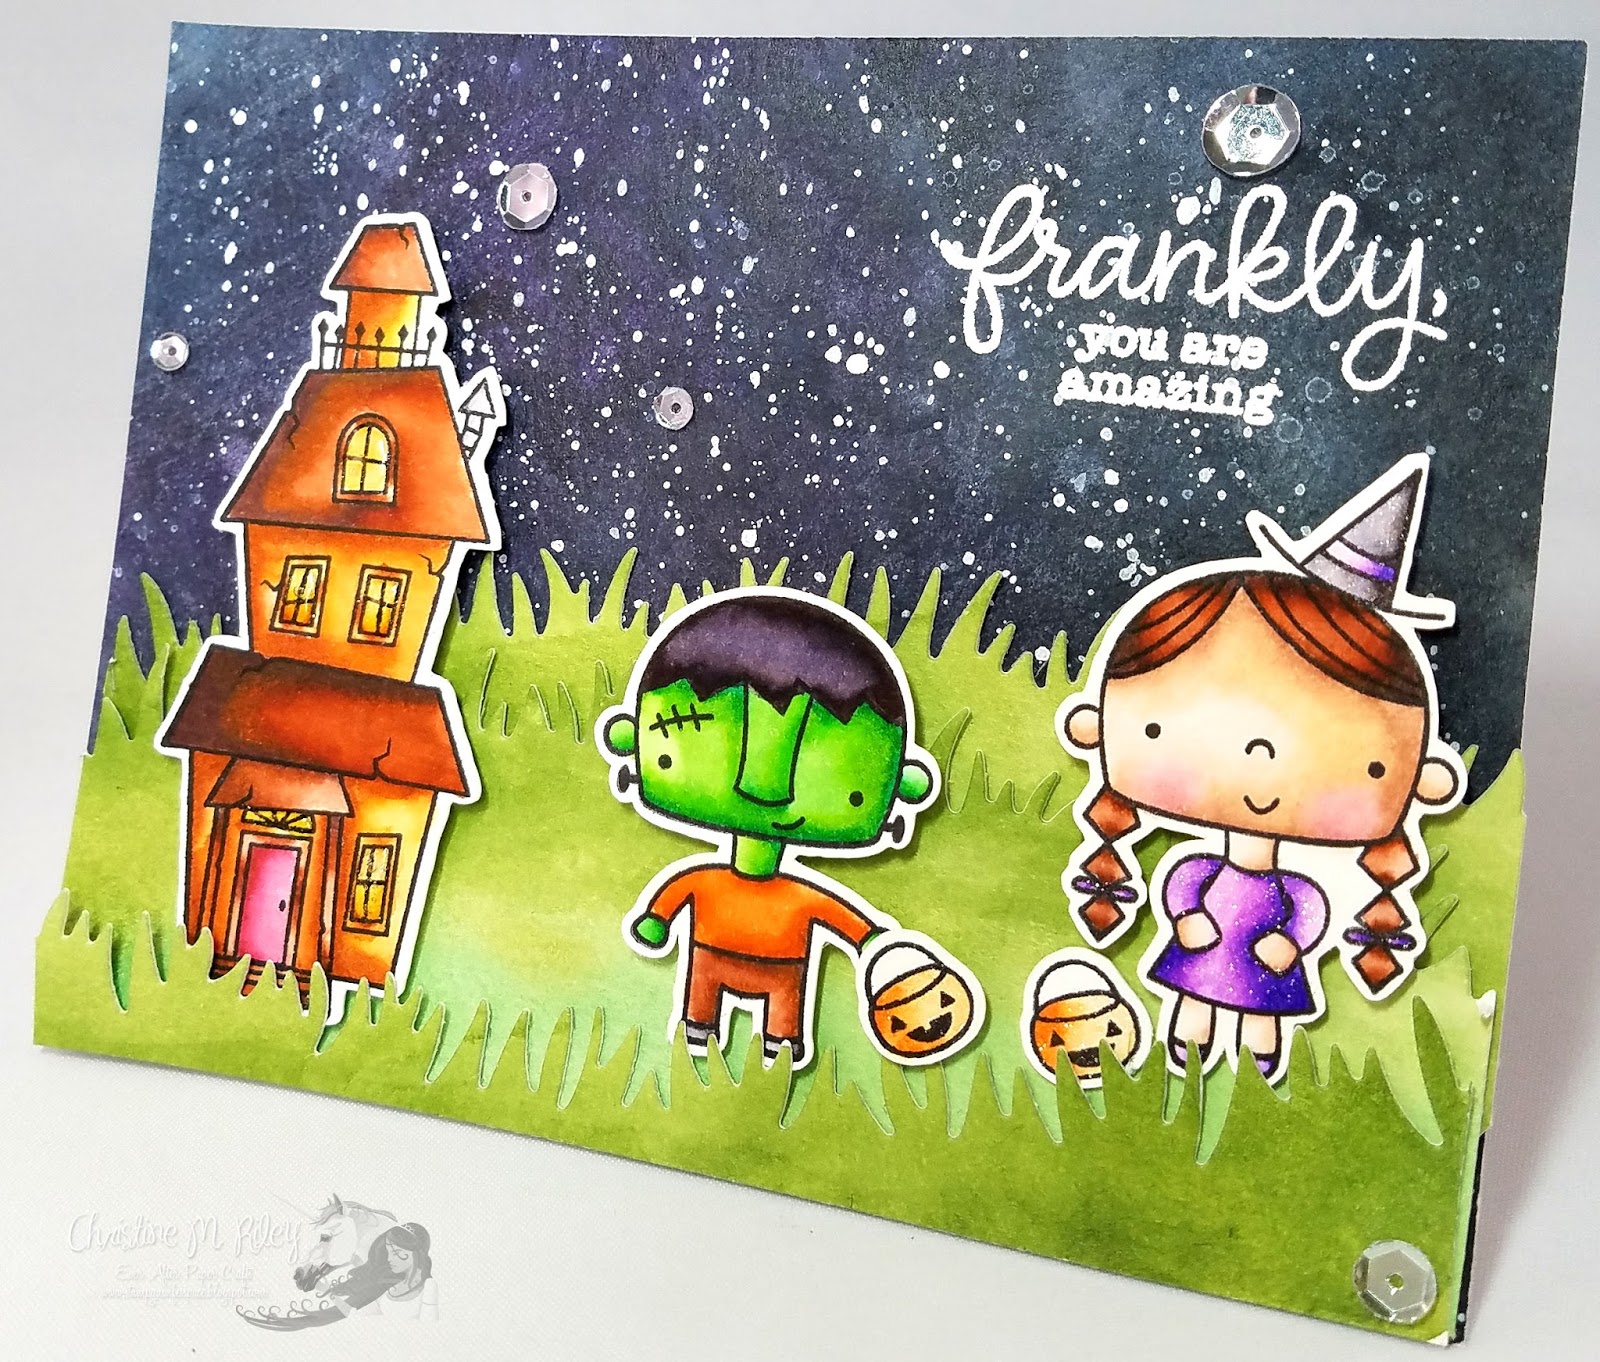
Hi everyone! I have a new card and video up today combining some stamps from My Favorite Things and Simon Says stamp. I water colored a galaxy/starry night sky background and the grass with my Gansai Tambi watercolor paints. I also painted the images with my Zig Markers and a water brush. You can view the video here:
And here are some pictures of my card:
For the Witch, I used the following Zig markers:
Hat: Black, Violet
Hair: Brown, Dark Brown
Dress: Violet, Light Violet
Shoes: Violet
For the pumpkin trick or treat baskets, I just used Orange
For Frankenstien, I used the following Zig markers:
Skin tone: Green, Light Green
Hair: Black
Shirt: Brown, Orange
Shoes: Black
Pants: Brown, Dark Brown
For the spooky house, I used the following Zig Markers:
Roofs: Dark Brown, Brown
Base of House: Brown, Light Brown
Inside Windows: Orange, Yellow
Door: Deep red
Exhaust Pipe: Gray, Light Gray
I used my Lawn Fawn Simple Grassy Hillside dies to cut out the grass. I adhered everything to the card base with foam tape and also white heat embossed the sentiment. What do you think?
Well, that's it from me today. Thanks so much as always for stopping by. Huge hugs!
Hi everyone! :) I hope you are having a wonderful week! I'm here for Butterfly Reflections, Ink with a fun and magical watercolor card. I created a video tutorial to show how I made the card and you can see that here:
(To view on YouTube, click HERE)
Hi everyone! :) It's Christine here for Butterfly Reflections, Ink and I'm super excited to share a fun Halloween card with you all today using some brand new Darcie's Heart and Home stamps and Gansai Tambi watercolor paints.
I have a video tutorial showing how I painted the cute witch image and how I created the galaxy background. You can see the video here:
(To view on YouTube, click HERE)
I then used the the Grassy Hillside Border Dies from Lawn Fawn. I also cut out the Village Border Die from Lawn Fawn. I then put my scene together by adhering the grass and village border straight to the night sky panel using regular adhesive. I then adhered all the images to the scene using foam tape and then adhered the entire panel to an A2 sized notecard using foam tape.I embossed the sentiment with white embossing powder so it would really pop. For a finishing touch, I added some sequins from my stash
For a finishing touch, I used my Wink of Stella Clear Glitter Pen to add some sparkle to the pumpkins and candy bowl. I also added some sequins from my stash. Make sure to head over to Butterfly Reflections, Ink for a look at these and all sorts of amazing products. Thanks so much as always for stopping by. Big Hugs!
Hi everyone! I'm here with you today to share a super cheery, bright, and fun card using the delightful and oh so adorable Everything Stops for Walkies image. This image was perfect for combining my love of coloring and water coloring onto a card to create a scene. I loved water coloring the background and I also painted the beautiful image. Who wouldn't love to go walking with that cute little puppy? :)
I have a quick video showcasing some of the great products used on this card:
(To watch on YouTube, click HERE)
To create this card, I used the adorable Everything Stops for Walkies Stamp Set and then I water colored the image with my Zig Markers and a water brush. I also created the fun watercolor background with watercolor paints and I added some shimmer paint to the top for some extra shine. I used the Splended Azure 6x6 Paper Pad for my design papers. This paper is so gorgeous, I can't get enough of it. I love the beautiful, rich colors and the color scheme. I used the Splendid Azure Cut Outs to stamp my sentiment onto and then I embossed my sentiment with some black embossing powder so it would really stand out. Finally, I used the absolutely gorgeous Dotted Wings Die Set to create the beautiful butterflies in the top left corner.
I just love the richness of the design paper and it was so fun finding watercolors to match the papers. Here is a close-up of the gorgeous butterfly die:
I added some silver glitter paper to the butterflies I put on top to give some extra shimmer and sparkle.
Here's another look at the Splendid Azure Cut Outs with the sentiment stamped right on. I just love how these coordinate perfectly with the design paper.
I had a slightly difficult time capturing all the shimmer I put onto the background with some shimmer paint. This next photo is not the greatest, but I wanted the fun shimmer to show through.
;0
If you click on this picture to make it bigger, you can really see the shimmer and shine :)
I really hope you enjoyed my card for today. Don't forget, you don't have to be good at water coloring to create a fun, abstract background scene on your card. It's so fun to do and I think it comes out looking really sweet. While you're here, don't forget to check out the Clearance Section at the shop to find some amazing deals.
I really hope you enjoyed my card for today. Thank you for joining us here at the LDRS Inspiration Blog. Remember we are always here to inspire you. There are some great deals in the CLEARANCE SECTION of our store available NOW and there is a DISCOUNT CODE available on the Spotlight product from the monthly NEWSLETTER so get signed up! Love video tutorials, our DT on the YOU TUBE channel will show you how to use the products. Visit us at any of our other Social Media locations and never miss out on inspiration with these great products!
Hi everyone! :) It's Christine here for Butterfly Reflections, Ink and I'm super excited to share a fun Halloween card with you all today using some brand new Lawn Fawn products and Distress Oxide inks. I created a video tutorial of how I created today's card and you can view that here:
(To view on YouTube, click
HERE)
For a finishing touch, I used my Wink of Stella Clear Glitter Pen to add some sparkle to the pumpkins and candy bowl. I also added some sequins from my stash. Make sure to head over to Butterfly Reflections, Ink for a look at these and all sorts of amazing products. Thanks so much as always for stopping by. Big Hugs!
Hi everyone! I hope you are having a wonderful day! :) I'm honored and thrilled to announce that I have been asked to join the Butterfly Reflections, Ink design team and today is my first DT post :) I'm so excited so without further adieu, let's get started :)
I created a video tutorial for my card today and here is a link to that:
(To view on YouTube, click HERE)
And here are some pictures of my card:
To create the background of my card, I used my Gansai Tambi 36 set Watercolor Paints (red, orange, and yellow) to paint the background. I then used my Gansai Tambi Starry Colors Pearlescent Paints to create the gold shimmer effect on the background. Next, I colored all the critters from the adorable Jump for Joy Stamp Set by Lawn Fawn using my Zig Markers and a Detailer Watercolor Brush. To color the fox, I used Brown, Red, Gray, and Light Gray. For the Hedgehog, I used Dark Brown, Brown, Light Brown, and Almond Pink. For the Owl, I used Dark Brown, Brown, Light Brown, and Yellow. For the leaves, I used Red, Deep Red, Orange, Olive Green, Brown, and Yellow.
I then cut out my critters and the colored leaves using the Coordinating Jump for Joy Dies. Next, I cut out the tree frame from the Leafy Tree Backdrop Die Portrait from Lawn Fawn out of brown cardstock. I adhered it to the watercolor panel using a strong double sided tape. I then cut out some leaves (also from the same Leafy Tree Backdrop Die Portrait from Lawn Fawn) from various colors of cardstock and then added glitter to them and to my colored leaves using my Wink of Stella Glitter Pen. I then adhered my leaves to my tree and around the panel using Glue Dots. I then adhered my critters and pile of colored leaves using foam tape. I also stamped my sentiment (also from the Jump for Joy Stamp Set by Lawn Fawn) onto the panel with black ink.
And that's it! :) I hope you enjoyed today's card and video. Make sure to head over to Butterfly Reflections, Ink to check out all the amazing products. Big hugs!!!
Hi everyone! :) I hope you are having a fantastic week! For all my readers affected by Harvey and to those in the path of Irma, I want you all to know you are in my thoughts and my prayers and if there's anything you need or anything I can do from here, please don't hesitate to ask.
I have a fun Halloween card and video to share with you all today. In this video, I share how I water colored this adorable witch image from My Favorite Things. Here's my video:
(To watch on YouTube, click HERE)
In this video, I share how I painted the adorable witch and I also share how I put the card together. To see how I created the exact watercolor background you see on the card, please watch this video here:
To create my card for today, I first created the background using the purple and gold paints from my Gansai Tambi watercolor paints. I then let the background dry and cut it out with a large stitched rectangle die from Lawn Fawn (it's the largest die in the Large Stitched Rectangle Die set that covers the entirety of an A4 sized card (4 1/4 by 5 1/2)). I used the Silver and Black watercolor paints from the same paint set to color the moon (which I cut out using a circle die I had in my stash).
Next, I stamped the adorable images from the adorable Witch Way is the Candy Stamp set by MFT using my Hero Arts Black Dye Ink (which is my favorite for water coloring). I then painted the images with my Zig markers and a water brush. To color the witch, I used the following colors: Black (for hat and cloak), Dark Brown and Brown (for hair), Violet and Light Violet (for dress and boots), Brown and Light Brown (for top of broom), Dark Brown (for broom stick), Light Green and Orange (for shirt and stockings), Yellow, Light Violet, and Violet (for band around hat), and Flesh Color, Blush, and Almond Pink for her skin tones. For the pumpkins, I used orange and then Dark Brown for the stems. For the cat, I used Black, Light Violet and Violet for the bow tie, and Light Green for his eyes.
Next, I cut the grass out of black cardstock using my Grassy Hillside Borders dies from Lawn Fawn. I adhered the grass to the bottom of the panel. I then used some white embossing powder to emboss the sentiment. Finally, I adhered all the images with foam tape onto the panel and then adhered the entire panel to the front of a white A2 notecard using foam tape. I added some Wink of Stella glitter pen to her dress and to the pumpkins and I also added some sequins (which I adhered using Ranger's Multi Media Matte glue). What do you think?
Well, that's it from me today. I hope you enjoyed today's card. Have a wonderful day!!!
Hi everyone! I have the honor this month of guest designing for Kindred Stamps. As a guest designer, I get to show off two brand new stamp sets releasing this week. The first is a set called Rhett and Scarlett and it's oh so fun. Here's my card:
I kept this card very simple. I wanted to create an outdoor scene so I used my Kuretake pearlescent paints to paint the sky and grass in a very simplistic way. The background has a beautiful shimmer and shine to it from the paints. I then colored the images with my Zig markers. For Scarlett, I used Light Brown and Green, Dark Brown and Brown for her hair, Flesh Color, Blush, and Almond Pink for her skin, and Light Blue and Green for her dress. For Rhett, I used Black for his hair and suit, Light Gray for his vest, and Flesh Color, Blush, and Almond Pink for his skin tone.
I'll have a video up tomorrow sharing how I created this card and the other sneak peek I get to do for Kindred Stamps (which I'll show you tomorrow) :) Hope you enjoyed this card. See you back here tomorrow :)
Unless otherwise stated all content is by Christine Riley. Please do not copy my work for submission for publication or contests. However, please feel free to copy/lift my cards or layouts for your own personal use. Thanks so much.