Monday, July 23, 2012

Belle of the Ball

Hi everyone and Happy Monday!  I hope you all had a wonderful weekend.  I have another card to share with you today so I'll get right to it. 


This particular card uses another gorgeous image from Saturated Canary (this was a freebie, I'm not sure if it's still available or not).  I colored the image with copics, inked around the image using my Tim Holtz blending tool, then put my card together.  My DP is from MME (it's a very old stack).  Here's a close up of my coloring:


 For some finishing touches, I added lots of Stickles, a bow, and roses from Wild Orchid Crafts.


What do you think?  Well, that's it from me today.  Thanks so much as always for stopping by.  Have a wonderful day! :)


Friday, July 20, 2012

Just For You

Hi everyone and Happy Friday!  I'm so glad the weekend is here :)  I have another card to share with you today using another fabulous image from Saturated Canary.  I can't say enough good things about these wonderful images.  They are SO much fun to color, I just love them. 


This particular image is called Neveah and I think she's just precious.  I colored her up with my copic markers and then sponged around the image with SU ink using my Tim Holtz blending tool.  I also added some Stickles to her dress.  Next I created my card base using SU cardstock.  My DP is from DCWV.  The flourish/swirl was cut out using my Cricut and my Stretch Your Imagination Cricut Cartridge.  Here's a close up:


I added some gorgeous roses from Wild Orchid Crafts (I added Stickles for some extra sparkle).  I also added some pearls.  Here's another closeup of the image with the roses:


I decorated the inside as well using another swirl cut out and a sentiment from the dollar bin at Michael's.  Usually I put my sentiments on the front of my cards, but I thought it was just too crowded so I put it inside this time.


What do you think?  Well, thanks so much again as always for stopping by.  I'm having so much fun getting back into using my copics and it keeps my mind occupied (as opposed to concentrating on how uncomfortable I am or stressing about the baby coming soon) :)  Have a wonderful day and a wonderful weekend.

Thursday, July 19, 2012

Summer Lovin'

Hi everyone and Happy Thursday!  I'm so glad the weekend is almost here, I'm beat and ready to spend a couple days with my feet up (and hopefully coloring) :)  I have another beautiful card to share today using another wonderful image from Saturated Canary.  I'll keep my chit chat short today and get right to it.


This particular image is called Cali Girl and I just love her.  Don't we all wish we looked this good at the beach :)  Hmmmm, I've done two beach-themed cards in two days, perhaps my subconscious wishes I was at the beach :)  We didn't make it to my beloved Charleston, SC this summer (too hard and uncomfortable with a baby on the way) but we plan to go next summer with the baby.  I can't wait!  Anyway, I colored this beautiful image with my copics (I hope I'm getting better, I feel like I am, but there are so many talented artists out there, it's hard to keep up).  I added some Stickles to her earrings and then sponged around the image using my Tim Holtz blending tool and some turquoise-tinted ink from Colorbox.  Heres' a close up of the image:


Next I created my card base using SU cardstock.  I cut out the pretty black swirls with my Cricut using the Stretch Your Imagination cartridge.  The waves were also cut out with the Cricut using the Life's A Beach cartridge.  My DP is from DCWV.  I put the card together and then added some pearls to the image panel and some gorgeous flowers from Wild Orchid Crafts (I also added some Stickles to them to give them a bit more pop).  Here's a close up of the flowers:


The cute sentiment is from Scrappy Moms Stamps.  What do you think?


Well, that's it from me today.  I've already colored another image (I swear I'm going crazy with these, this is the weirdest "nesting" behavior I've ever heard of :) ) so I might even have another card to share with you tomorrow :)  Have a wonderful day and thanks so much as always for stopping by!


Wednesday, July 18, 2012

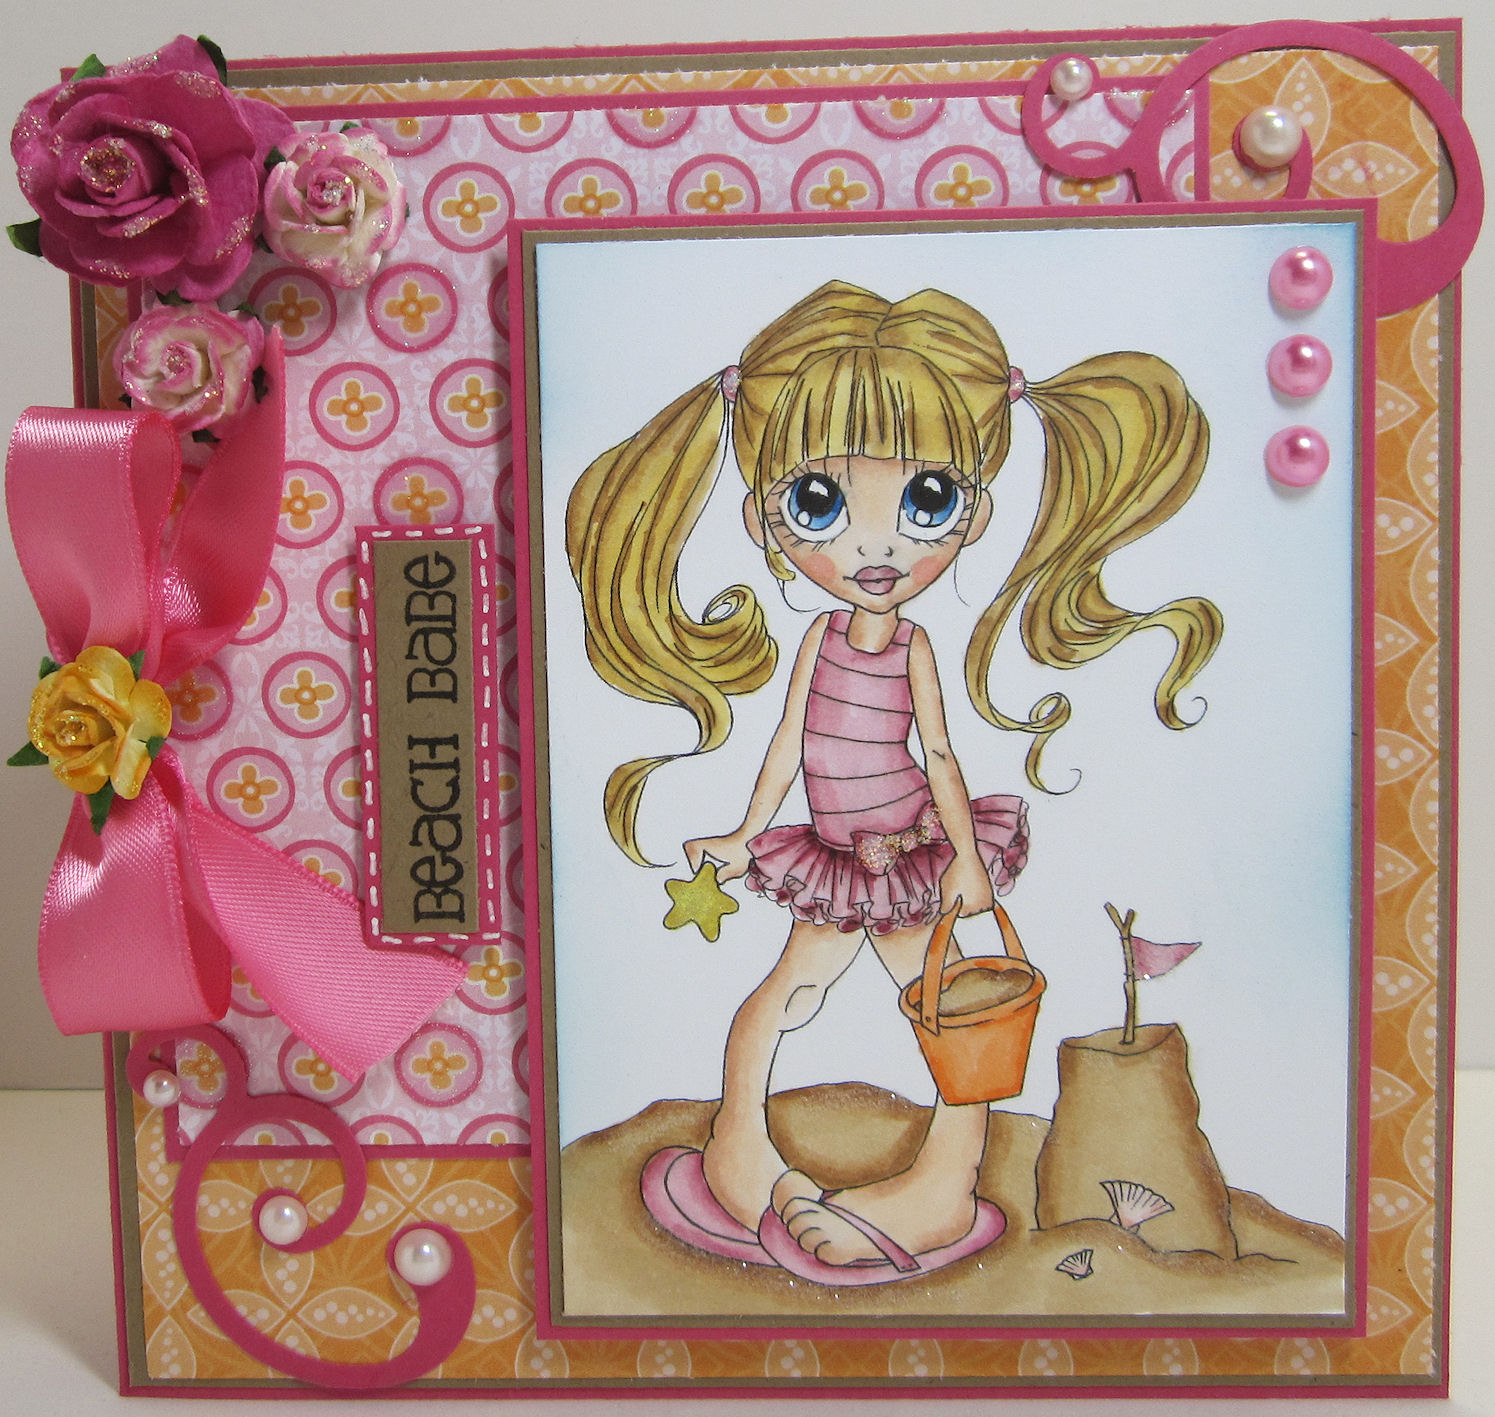
Beach Babe

Hi everyone and Happy Wednesday! :)  I hope you are all staying cool in this heat.  I am 36 weeks along in my pregnancy as of today and hubby and I couldn't be more excited to meet our little one :)  I've heard that around this time, many women start "nesting" (i.e. cleaning house, getting the nursery finished, etc.).  Other women, like me, discover a new stamp company and become obsessed with coloring fabulous images :)  Luckily, hubby and I have the nursery completed except for  just a few odds and ends and the house is in really good shape :) 

A long time ago, I kind of put my copic markers away and started focusing on making cards and scrapbook pages using my Cricut and my Silhouette.  I think I did this mostly because I wasn't happy with my coloirng skills with the copics and I expceted more from myself.  Don't get me wrong, I love making cards with my Cricut and my Silhouette and I will continue to do that.  I just like doing all sorts of things when it comes to crafting and I found that I was missing coloring and stamping.  So, since I've had a lot of down time with being pregnant and trying to get lots of rest, elevate my feet, etc., I started watching tons of tutorials on copic coloring, determined to improve my skills.  In the process, I also discovered these amazing images from http://saturated-canary.myshopify.com/"> Saturated Canary.  They are digi images (I don't have the best printer for these), but I decided I just had to try them any way.


Isn't this an adorable image?  This image is called http://saturated-canary.myshopify.com/products/beach-baby"> Beach Baby and I just love her.  I colord her with copics (I know I still have a lot to learn and this is my first time coloring in probably over a year, but I'm please with how it turned out, hopefully I'm on the right track).  Here's a close up:


After I colored her up, I added lots of glitter to the sand and to the star fish in her hand.  Next I inked around the image using my Inksentials blending tool from Tim Holtz and some blue ink from Colorbox.  I then put my card together using SU cardstock. My DP is from DCWV (Baby Girl stack).  I added swirls in the corners using an EK Success punch.  The flowers are from Wild Orchid Crafts, I added some glitter to them using my Stickles:


Finally, I added some pearls for some extra bling.  My sentiment is from Pink By Design.  I'm entering this card into the "Bling It On" challenge over at the Saturated Canary Challenge Blog. 


What do you think?  Well, I hope you enjoyed my card today as I jump back into using my copics.  Thanks so much for stopping by.  Posting right now will still be pretty erratic from me until the baby comes and we get on a schedule, but I will post again as soon as I can.  Have a wonderful day! :)

Friday, June 1, 2012

Hey Girlfriend!

Hi everyone and Happy Friday! :)  I have a quick and simple little card I put together to share with you today so I'll get right to it. 


For my card today, I just had to use an image from the new Cricut Teen Scene Paper Doll cartridge.  I love this cartridge, so girly and fun to play with :)  I designed the entire card with my Gypsy.  I cut the teen out, put all the pieces together, and did some doodling with my white gel pen.  The adorable face is from Peachy Keen Stamps.  The card base was created using a scalloped rectangle from Cricut's Lacy Labels cartridge.  I welded two together to create the card base.  I did lots of doodling with my white gel pen.  I adhered the girl to the card base using dimensionals.  I added a ribbon and a rose from Wild Orchid Crafts.  My sentiment is from an old Hanna Stamps set.


What do you think?  Well, that's it from me today.  Thank you so much for stopping by.  Have a wonderful day and a wonderful weekend.

Friday, May 11, 2012

It's Your Day!

Hi everyone and Happy Friday! :) I'm so glad the weekend is almost here. I have a super fun project to share with you today so I'll get right to it. For my project today, I was honored to volunteer to create a project using a cut file from a new pattern set from My Scrap Chick. I was asked to work with this adorable caddy which should be available soon from My Scrap Chick ("MSC").


How fun is this little 3D item?!?! First, I downloaded the SVG file into SCAL 3.0. I didn't resize it, I just left it the size it came (which is the perfect size for what I was looking for). I then cut the image out using my Silhouette. What is really awesome about this file from MSC is that the score lines are included in the cut and the score lines are perfect! You don't even have to actually score them with a scoring tool, just fold. LOVE that feature. After I cut the caddy out, I put it together (I use Scor-Tape for all my 3D items, it works great!). I then decided to embellish the little box using DCWV designer paper. I also wanted to decorate the front of the box with a cute little bear from MSC (this particular one is from the Valentine Bears set, available HERE).


I used SCAL 3.0 and my Silhouette well to cut this pattern out. I cut it pretty small so it would fit on the front of the box and this just really shows how well the Silhouette cuts, even the tiniest pieces are just perfect. I put everything together and then did some doodling with my white gel pen.
I decorated the sides of the box as well with my DP and a swirl, which was made using an EK Success punch. The flower decorating the top of the box was cut out using my new Flower Shoppe Cricut Cartridge. The sentiment is from an old Hero Arts set.


I then wanted to put some confetti type paper in the inside of the box for decoration. I shredded a piece of black cardstock using my paper shredder and then folded the individual pieces. It just makes for a little something extra. I thought this would be an adorable way to package some fun Mother's Day gifts or birthday gifts. It's such a super cute and fun way to package a small gift.   You can see, there's even a divider on the inside which creates two sections.  SO cute!  What do you think?


Well, that's it from me today. Thanks so much as always for stopping by. Have a wonderful day and a wonderful weekend!

Saturday, May 5, 2012

I'm back - Happy National Scrapbooking Day

Hi everyone and Happy National Scrapbooking Day! :) Wow, it's been a long time since I've posted on here and there's a really good reason :) I last posted in December, which is the time I discovered that my husband and I are expecting our first child!!!! We are SO thrilled and SO excited. The first trimester was fine, just the typical issues there. Once I got out of that trimester, we started working on the nursery, which unfortunately was my craft room :) That meant we had to take everything out of the craft room (boy did I have a lot of stuff), organize it, move most of it to the basement (which right now is unusable for anything but storage) and then carve out a little nook for me in the sitting room of our bedroom to use as a crafting area until we can get the basement finished. That took so much work and I do get tired pretty easily so it just took a long time to be able to have a functional space again. But, now I'm six and a half months pregnant, baby and I are doing great, and I have a small space in which to craft so things couldn't be any better :) I won't be crafting with any regularity for now, just whenever I feel up to it and have the chance, but it does feel good to get to working with paper again :) Well, enough about me and onto my card for today.


For my card today, I decided to center my project around this ADORABLE image from My Scrap Chick called Be Mine, from the amazing Tiddly Inks. I had SO much fun piecing this project together. I cut the image out using my Silhouette and SCAL 3.0. I ran her dress through my Cuttlebug using my Swiss Dots embossing folder. I then inked with some dark brown ink around her hair, and then, instead of using the eyes for her and the hedgehog that come with the pattern, I omitted those and stamped the faces using my wonderful Peachy Keen Stamps (Princess Face Assortment).


Next I created my card base using SU Melon Mambo carstock, my favorite SU color. I rounded the corners on the right side using my Creative Memories corner rounder punch (I've had this punch forever and it still works perfectly :) ). I then added some white cardstock and then my DP, which is from DCWV (Baby Girl stack). Next I decided to cut out some grass using my Cricut. I used my Gypsy to plan how tall I wanted the grass. The grass was cut from the Create a Critter cricut cartridge. I then inked all the grass pieces with green ink and then adhered the grass to the card base using dimensionals.


Next I adhered the main image to the card base also using dimensionals. If you've ever been to my blog before, you know how much I love using flowers as accents for my cards. For an early birthday present, my mother-in-law bought me the Flower Shoppe cricut cartridge so now I can make my own roses. I'm SO in love with this cartridge. What money I will save on having to buy mini roses and Primas! I cut the roses and leaves out using my Cricut and the Flower Shoppe cartridge. They are so easy to put together. I then adhered them to the card base.


The sentiment I thought went perfectly with the image. The sentiment is from My Creative Time (You Had Me at Chocolate stamp set). Finally, for a final finishing touch, I added a white sheer bow.
 

What do you think?  Well, that's it from me today. Sorry for the super long post, I had a lot to share :) Thanks so much for stopping by and I hope to be back soon with another project to share. Have a wonderful day and Happy National Scrapbooking Day. Get crafty! :)

...and they lived happily ever after.
blog design by vk design company