Hi everyone! Hope you are having a wonderful week. I have a new video tutorial to share with you today showing how I colored this gorgeous peony flower from The Ton Stamps with my Zig markers. I also show how I created the distress inked background. Here's the video:
I first embossed the flower and leaves onto Bristol Smooth Cardstock with Wow Metallic Gold Sparkle embossing powder. I then used Pink, Light Pink, and Olive Green Zig Markers and a water brush to color the flower and leaves. I then used the coordinating dies to cut the flower and leaves out. To create the distress background, I used Spun Sugar distress ink and Work Lipstick distress oxide ink and some gold flecks of paint from the Starry Colors Gansai Tambi pearl paint set. Here are some pictures:
I hope you enjoy the card and the video. Thanks so much as always for stopping by. I'll see you in the next video.
Hi everyone! Thanks so much for stopping by. Today I have a two part video tutorial on how I created a galaxy background with this brand new adorable Upon a Star stamp set from Lawn Fawn. In Part One, I demonstrate how I created the background with water coloring and distress inks. In Part Two, I show how I created the grass and how I colored the critters.
Part One:
Part Two:
And here are some pictures:
And here's the one I created on camera (it's so neat that each time you do this technique, it turns out differently!):
To create the background, I water colored using Salty Ocean, Peacock Feathers, Seedless Preserves, Chipped Sapphire, and Black Soot distress inks. I also spashed some white acrylic paint and some gold and silver paint from Gansai Tambi Starry Colors paint palette. For the grass, I sponged on Mowed Lawn and Pine Needles distress inks and spritzed some water. I then put some Black Soot ink on to create a shadow using a sponge dauber. I used Lawn Fawn dies to cut out my rectangle and my grass. I colored my fox and my bunny using my Zig Clean Color Real Brush markers. For the fox, I used Deep Red and Brown. For the Bunny, I used Gray, Light Gray, and Almond Pink. I then used the coordinating dies to cut them out. I stamped some of the constellations on the background and embossed them with white embossing powder. I also white embossed the sentiment (also from the stamp set). Finally, I added some sequins. What do you think?
Well, that's it from me today. Thanks so much as always for stopping by and I'll catch you in the next video!
Hi everyone! I hope you are all having a wonderful day and for my friends in the US, I hope you are having a great start to your Memorial Day weekend! I have a fun video and card to share with you today using an adorable stamp set from Simon Says Stamp and some other products to create a fun scene on my card. Here's my video tutorial:
And here are some pictures:
I used my Lawn Fawn Simple Grassy Hillside dies to create the grass. I then used the new Cloud Stencil from My Favorite Things to create the cloud background (I used Broken China Distress Oxide ink). I then stamped all the images from the adorable Some Bunny Special stamp set from Simon Says Stamp with Black Dye ink from Hero Arts. I then colored all of the images using my Zig Clean Color Real Brush markers and a water brush. I used Gray Brown and Peach Pink for the bunny, and brown for the pot he's standing on and Light Green for the grass. I used Gray, Wine Red, and Dark Oatmeal for the mailbox. I used pink, yellow, and light green for the pink flowers and light blue, yellow, and light green for the blue flower. I used orange and light green for the carrots. I also heat embossed my sentiment (also from the same stamp set) with white embossing powder from Simon Says Stamp. Finally, I added some sequins from Pretty Pink Posh (the friendship mix). What do you think? Well, that's it from me today. Thank you all so much as always for stopping by! Big hugs!
Hi everyone! I hope you are all having a fabulous week. I have a new video tutorial and card to share today using this gorgeous stamp set from Simon Says Stamp called More Spring Flowers. I love this stamp set, it was so much fun to color these flowers in. In my video tutorial for today, I show you some tips on how I use my Zig Clean Color Real Brush markers to create multiple colors when coloring flowers. I also show you how you can use one marker color to get gorgeous shaded results using that marker and a water brush. Finally, I also show you how I created the distress inked background. Here's the video tutorial:
And here's some pictures:
I inked all the flowers in Versamark ink and then heat embossed them in white embossing powder. For the background, I used Picked Raspberry and Mowed Lawn distress inks to create the blended background, then I spritzed the background with some water for a distressed look. To color my flowers, I used the following Zig marker colors: Pink, Light Pink, Blue Gray, Yellow, Orange, Olive Green, Light Green. The sentiment is from the Hero Arts You are Loved stamp set. Twenty-five percent of all proceeds from this stamp set go to the Jennifer McGuire Ink Kindness Campaign, which is such a worthwhile cause. I stamped the sentiment in Versamark ink and heat embossed it with white embossing powder. I added all of the elements with foam tape. I then added some Nuvo Crystal Drops in Morning Dew and Carnation Pink. I coated all the flowers with Wink of Stella clear glitter. What do you think?
Well, that's it from me today. Thank you so much as always for stopping by. Have a wonderful day!
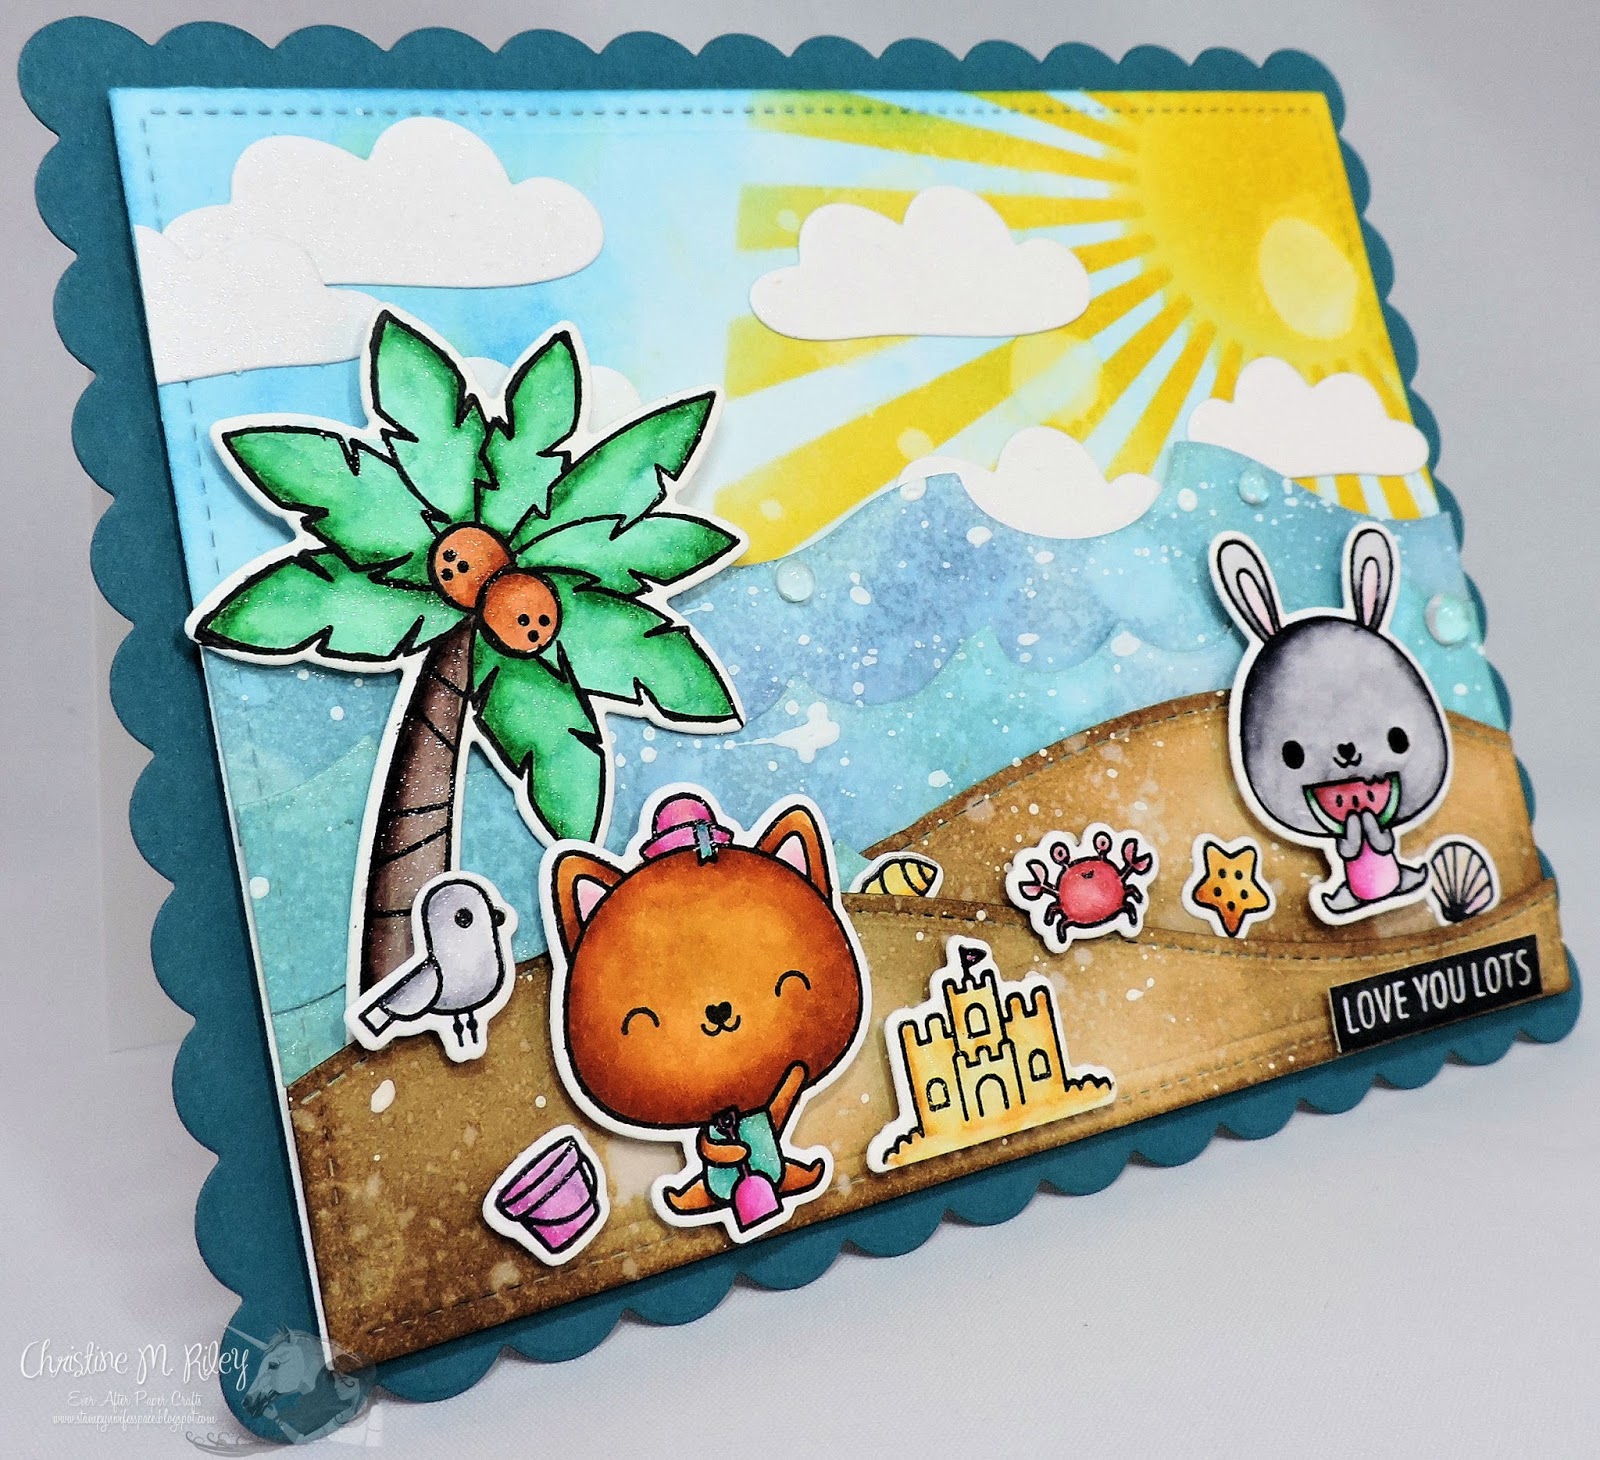
Hi everyone and Happy Monday! I hope your week is off to a wonderful start! I'm super excited to share my card with you today. I just recently got some stamps from the brand new Mama Elephant stamp release and I just had to play with this new set called Summer Days. This set was SO much fun to play with. I couldn't stop coloring the little critters (and as you'll see in my video, I have a ton that I already colored for future cards :) ). Here's a link to my video tutorial:
And here are some pictures of my card.
I colored all the images with my Zig Clean Color Real Brush markers (any time I use Zigs or do any ink blending, I use Bristol Smooth cardstock, so all white cardstock in this card is Bristol Smooth). I used Antique Linen, Vintage Photo, and Walnut Stain distress inks for the sand dunes. I used Broken China and Faded Jeans Distress Oxide inks for the ocean. I used Salty Ocean distress ink for the sky and Mustard Scene for the sun (which I made using my Radiating Rays stencil from My Favorite Things). I used stitched hillside border dies from Lawn Fawn for the sand dunes and Ocean Waves die-namics dies from My Favorite Things for the waves. I used the Cloud 9 die-namics dies from My Favorite Things for the clouds. I coated just about everything with my Wink of Stella Glitter Pen so it all has a really pretty shine. The sentiment is from another Mama Elephant stamp set called Organic Blooms.
I hope you enjoyed my video tutorial and my card for today. I had so much fun putting this scene together. Thanks so much as always for stopping by and I'll see you tomorrow with another card and video! :)
Hi everyone and happy Saturday!!! :) I hope you are all having a fabulous weekend. Today is my birthday (the big thirty-six :) ) and I have had a wonderful day. To top my day off, I was honored to be asked to participate in a blog hop celebrating Your Next Stamp's May 2017 release. It is fabulous! I have created four card samples using the amazing products I was provided and I also created a video showing how to make one of the cards using a distress ink technique as well as coloring with Zig Clean Brush markers. I think my absolute favorite set has got to be "Got Mud." I have 2 boys (one is 4, the other is almost 1) and my four year old is in love with this set and has already claimed the two cards I made for this blog post :) I could see using this set for boy birthday party invites, scrapbook pages, all sorts of things! I love it!
This will be a photo heavy post since I have four cards to share so I'll get right to it. Here's my first card using the brand new Got Mud stamp set:
For this card, I used the brand new Got Mud stamp set from Your Next Stamp. To create the hills, I used the stitched Rolling Hills dies from Lawn Fawn and then used Antique Linen, Vintage Photo, and Walnut Stain distress inks and some water to create the distressed effect. I did the same thing on the top with Salty Ocean distress ink. I then colored the cute trucks with my Zig Clean Color markers and a water brush. I added Glossy Accents to the windows and then cut them out and popped them up using foam tape. The sentiment was embossed using white embossing powder from Stampin' Up. The gorgeous accents are from the newly released Gumdrops enamel dots. I love them, the pictures don't do them justice.
For my next card, I used two new stamp sets, Got Mud and Mud Splatter. I stamped the background image from the Mud Splatter stamp set to create my background pattern on my Neenah Desert Storm cardstock. I then cut out two circles using the stitched circle dies from Stampin' Up! I used Salty Ocean and the same brown distress inks as used above to create the background on the first circle. I then adhered it to another circle cut out with Stampin' Up's Chocolate Chip cardstock. I then colored the adorable truck from the God Mud stamp set with my Zig Clean Color markers, added Glossy Accents to the window, and then cut it out and popped it up with some foam tape. I added some bakers twine for interest and then heat embossed the image using white embossing powder.
For my third card, I used images from the adorable brand new stamp set, Waddles - Fortune Teller. How adorable is this stamp set?!?! I created the background using distress inks (Mustard Seed, Spiced Marmalade, and Picked Raspberry and then spritzed some water to get the distress look. I then cut out a circle using my stitched circle dies and then added my images, which were colored with my Zig Clean Color markers. I added some clear Wink of Stella to the curtains for some shimmer. I then added some Baker's Twine and then embossed the sentiment with white embossing powder. The gorgeous accents are from the newly released Gumdrops enamel dots.
For my fourth and final card for today, I again used the Waddles - Fortune Teller stamp set. I colored the images using my Zig markers. I created my background using Spiced Marmalade and Picked Raspberry distress inks and some water. I added some Baker's Twine and then stamped the sentiment in black ink. The gorgeous accents are from the newly released Gumdrops enamel dots.
I also created a video tutorial on how I created this last card. I'd love for you to check it out:
Phew, thanks so much for making it this far! :) For following the hop, you have a chance to win one $25 gift certificate to Your Next Stamp. The more blogs you visit and comment on, the greater your odds of winning, but you do not have to comment on every to be qualified to win.
Also, don't forget to use the above coupon code on your purchase to save 20% off your entire purchase!
Okay, I think that's it from me. Thanks so much for stopping by. I'd love it if you left me a comment and/or had a chance to watch my video. I hope it is helpful to you. Have a wonderful day and make sure to stop by Your Next Stamp and check out this awesome release. Also, below is the hop order, so make sure to check out all the amazing projects by the design team and guests!
Unless otherwise stated all content is by Christine Riley. Please do not copy my work for submission for publication or contests. However, please feel free to copy/lift my cards or layouts for your own personal use. Thanks so much.