Hi everyone! I'm here today to share how I created a sweet Christmas card with Tombow Dual Brush water based pens. Here's a video which explains exactly how I put this card together:
(To view on YouTube, click HERE)
And some pictures:
To create this card, I first stamped the adorable Santa and chimney images from the adorable Holiday Peekaboo Stamp Set from Sweet Stamp Shop. I then colored the image with the Tombow Markers and then cut it out with a stitched square die from my stash. I then water colored my own striped background and then adhered everything to a 4 Bar notecard. I also stamped the sentiment with Versamark ink onto some black cardstock and heat embossed it with some white embossing powder. Finally, I added some black Nuvo Drops for a finishing touch. What do you think?
Well, that's it from me today. Thanks so much for stopping by. Have a wonderful day!!!!
Hi everyone! I hope you had a wonderful weekend! Sorry for the late post tonight, but the weekend got away from me. Lots of family activities, preparing for my husband's birthday which is tomorrow, and of course, finishing Stranger things Season Two! :) But I finally have my card and video up for you. I decided to create a fun rainy scene with a new image from Honey Bee Stamps. I also did some stencil work with a new stencil from Honey Bee. Here's my video:
(To view on YouTube, click HERE)
And here are some pictures of my card:
To create this card, I first inked up the background. I placed a piece of low tack tape onto some Canson XL watercolor paper to divide the cardstock. I then inked the bottom with some Iced Spruce Distress Oxide Ink. Next, I moved the tape to cover the Iced Spruce and inked the top 2/3 of the cardstock with Salty Ocean Distress Oxide Ink and Faded Jeans Distress Oxide Ink and then spritzed the panel with water from my distress sprayer. I then set that panel aside to dry. I next inked up the gorgeous image from the Seasonal Sweeties Stamp Set from Honey Bee Stamps and stamped it onto some Canson XL watercolor paper. I then painted the image with my Zig Markers and my Detailer Water Brush. Here are the Zig Colors I used:
Large Umbrella: Deep Red, Pale Rose
Hair: Light Brown, Brown
Scarf: Yellow, Brown
Jacket: Deep Red Pale Rose
Boots: Black
Skin: Flesh Color, Blush, Sugared Almond Pink
Dog Umbrella: Peacock Blue
Dog: Brown, Light Brown
Next, I cut the image out (but made a boo boo, so I fixed it by adding some black twine onto the umbrellas). Next, I brought back over my distress inked panel and laid the rain drop stencil from the Fall Showers Stencil Set from Honey Bee Stamps on top of the panel and then placed some Cosmic Shimmer Aurora Sparkle Texture Paste over top the stencil so it would lay inside the grooves of the raindrops and result in shimmery rain drops on the panel. I then let that dry and then placed my colored image onto the panel with some foam tape. Finally, I inked the sentiment with some Versamark Ink and embossed it with white embossing powder. Finally, I added some Silver Lining Nuvo Crystal Drops onto the sentiment panel and then added some clear shimmery sequins to the main panel (which I adhered to an A2 sized notecard with foam tape). What do you think?
Well, that's it from me today. Thank you so much as always for stopping by and I hope you have a wonderful day!!!
Hi everyone! I'm here today to share a card created using some gorgeous products from Kennedy Grace Creations. Here's my card:
To create this card, I first stamped the beautiful sunflower image from the Beautiful Bloom - Sunflower Stamp Set with some Versamark Ink onto some Canson XL Watercolor Paper. I then embossed the image with some white embossing powder. Next, I painted the image with my Zig Markers and a water brush. I used the following colors:
Center of Sunflower: Dark Brown and Brown
Petals: Brown, Yellow
Leaves and Stem: Green, Light Green
Next, I cut the water colored panel out with a stitched rectangle die and then adhered it to some design paper, then adhered the entire panel onto a standard A2 sized card base. I stamped the sentiment, also from the stamp set, onto the panel. I then adhered some beautiful sequins from the Lemon Sorbet Sequin Mix onto the panel. This was a really easy card to put together, but I think it turned out lovely. These gorgeous floral images from Kennedy Grace Creations make card making super easy :)
I really hope you liked my card for today. Thanks so much as always for stopping by and have a wonderful day!
Hugs, Christine
Hi everyone! I'm here with you today to share a super fun Christmas card using several new dies from Little Darlings. As an added bonus, all dies and embossing folders are on sale 20% off until October 31. Just use the code STAMPTOBER20 at checkout to get the discount!
To create this card, I used some beautiful design paper from the Winnie Winter Land 6x6 Paper Pack. I then used some white cardstock to place behind the design paper and cut it out using the gorgeous Holly Border Die (I also cut the top of the design paper with the second die in the Holly Border Die set so they would match when paired on top of each other). I then cut out Christmas Word Die with some Gold Foil Paper and then three pieces of white paper underneath to give it a slight shadow and some dimension. I then cut out the Cheer Word Die out of some red cardstock and then three pieces of white cardstock underneath to give it some dimension as well. I then added some glitter to the word Cheer using my Wink of Stella Glitter Pen. I then adhered the bottom design paper and Holly Border die to some black cardstock and then adhered my two word dies on the top part of the black cardstock. Next, I used the gorgeous Grace Ornament Die Set to cut out the beautiful ornament (I used red cardstock and gold foil paper). I added some black twine to the hole the die makes in the ornament and tied a bow and then adhered the ornament to the black cardstock panel using foam tape. Finally, I adhered the entire black cardstock panel to a standard white A2 card base.
Here's a video tutorial showing how I put this card together:
Don't forget to check out the Clearance Section to find some amazing deals. Also, don't forget the amazing 20% off sale on dies and embossing folders from now until October 31 (use the code STAMPTOBER at checkout to get the discount).
I really hope you enjoyed my card for today. It is super possible to create really gorgeous, elegant holiday card by just using some of these new dies.
Thank you for joining us here at the LDRS Inspiration Blog. Remember we are always here to inspire you.
There are some great deals in the CLEARANCE SECTION of our store available NOW and there is a DISCOUNT CODE available on the Spotlight product from the monthly NEWSLETTER so get signed up! Love video tutorials? Our DT on the YOU TUBE channel will show you how to use the products. Visit us at any of our other Social Media locations and never miss out on inspiration with these great products!
Hi everyone! It's Christine here for Butterfly Reflections Ink and I have a new card and video tutorial to share with you today. I'm really excited to share today's project. It uses a brand new release from Honey Bee Stamps. I was blown away with Honey Bee Stamp's most recent release and I bought almost the entirety of it from Vanessa's shop. Here's today's video:
(To view on YouTube, click HERE)
And here are some pictures of my card:
To create today's card, I first created the background. To do that, I inked a piece of Canson XL Watercolor Paper (cut slightly smaller than an A2 sized card base) with Wild Honey Distress Oxide Ink, WornLipstick Distress Oxide Ink, and Candied Apple Distress Oxide Ink. I also spritzed some black ink onto the panel for an extra touch. Next, I used the Fall Showers Stencil from Honey Bee Stamps and applied some Gold Glitter Paste to the stencil, which resulted in the beautiful gold leafs you see on the panel. Next, I stamped the Seasonal Sweeties Stamp Set from Honey Bee Stamps onto some Canson XL Watercolor paper and then painted the image with my Zig Markers and my Detailer Water Brush. I used the following Zig Markers:
Girl's Hair: Dark Brown, Brown
Girl's Coat: Deep Red, Pale Rose, Peacock Blue for buttons
Girl's Scarf: Peacock Blue
Girl's boots: Brown, Light Brown
Girl's Skin: Flesh Color, Blush, Sugared Almond Pink
Cat fur: Brown, Light Brown
Cat ears and cheeks: Light Pink
I then cut the image out using the Coordinating Forest Friends Honey Cut Dies and then adhered it to my distressed panel with foam tape. Next, I stamped the sentiment with Versamark Ink onto some black cardstock and embossed it with white embossing powder. I then cut it out and adhered it with foam tape. I then adhered the entire panel to a standard A2 sized card base. For a finishing touch, I added some Ebony Black Nuvo Crystal Drops What do you think?
Thanks so much as always for stopping by. Have a wonderful day!
Hi everyone! I hope you are all having a wonderful day. I have a fun new Halloween card to share with you using the adorable Happy Howloween Stamp Set from Lawn Fawn. I have a video tutorial to share as well, showing how I put this card together:
(To view on YouTube, click HERE)
And here are some pictures of my card:
To create my card, I stamped all of my images onto Canson XL watercolor paper and then colored them with my Zig Markers and my Detailer Water Brush. I used the following colors:
Dog in pumpkin costumer: Dark Brown, Brown
Pumpkin Costume: Brown, Orange, Dark Brown
Dog in Witch Costume: Brown, Light Brown
Witch skirt: Black
Witch Hat: Black, Violet, Light Violet
Pumpkin bucket: Orange
Bone: Light Gray
I then cut out all of the images with the Coordinating Happy Howloween Die Cuts from Lawn Fawn. This stamp set is so fun to play with, it's like paper dolls with puppies! :) It's so fun to pick out their little outfits and dress them up :)
Next, I created my galaxy night sky background using my Gansai Tambi 36 set Watercolor Paint set. Next, I cut out the tree frame and the little hillside using the Leafy Tree Backdrop - Portrait Die Set from Lawn Fawn. I then stamped some bones from the stamp set onto the hillside using some Versamark Ink and some white embossing powder. I then adhered the frame die and the hillside die to the watercolor panel with some Scor Tape (1/8 inch). I then adhered the entire panel to a standard A2 sized card base with foam tape. I then stamped the sentiment with some Versamark Ink onto some black cardstock and then embossed it with white embossing powder. I then adhered it with foam tape. I then adhered the puppies to the panel with foam tape. I added some Metallic Gold Confetti Mix Sequins from Pretty Pink Posh to the panel for a fun touch. Finally, I added some Ebony Black Nuvo Crystal Drops to the eyes and nose of the puppies to make them pop. What do you think?
Well, that's it from me today. Thanks so much as always for stopping by. Hugs!!!
Hi everyone! I have a super cute set of notecards to share with you today using the brand new just released Merry Cactus Stamp Set from Sweet Stamp Shop. I have a video tutorial to share showing how I put these cards together:
(To watch on YouTube, click HERE )
And here's a picture:
These cards are super simple, but super fun to create and would be really easy to reproduce for the holidays. To create the cards, I used some Mowed Lawn Distress Ink. I rubbed the pad onto a palette and then with a paintbrush, added some water and painted the watercolor background. I then used my Zig Markers and a water brush to color the images. I used Green and Light Green for the cactus and Dark Brown for the pot. I added some sequins from my stash to finish it off. Again, super easy cards to make, but fun! :)
I hope you enjoyed today's video. Thanks so much as always for stopping by. Huge hugs!
Hi everyone! I'm so lucky to be designing this month for Sweet Stamp Shop. I got to play with their brand new release and today's video showcases a brand new stamp set called "That's What She Said." It's such a fun tongue in cheek set and if you ever watched the TV show The Office, you'll get a kick out if it, I'm sure. It's also a great birthday set for standard birthday cards. Here's my video:
(To view on YouTube, click HERE)
And here are some pictures of my card:
To create these cards, I inked some distress oxide ink onto the panel (for the pink, I used Picked Raspberry, for the gift box, I used Salty Ocean). I then colored the images with my Zig Markers and a water brush, added the sentiments to the Kraft panel using the same Oxide ink, added the sentiment with black ink to the main panel, then popped the images with foam tape. Super simple but fun. To purchase the stamp sets, head over to Sweet Stamp Shop.
Hi everyone! It's Christine here for Butterfly Reflections Ink and I have a new card and video tutorial to share with you today. I'm really excited to share today's project. It uses a brand new release from Honey Bee Stamps. I was blown away with Honey Bee Stamp's most recent release and I bought almost the entirety of it from Vanessa's shop. Here's today's video:
(To view on YouTube, click HERE)
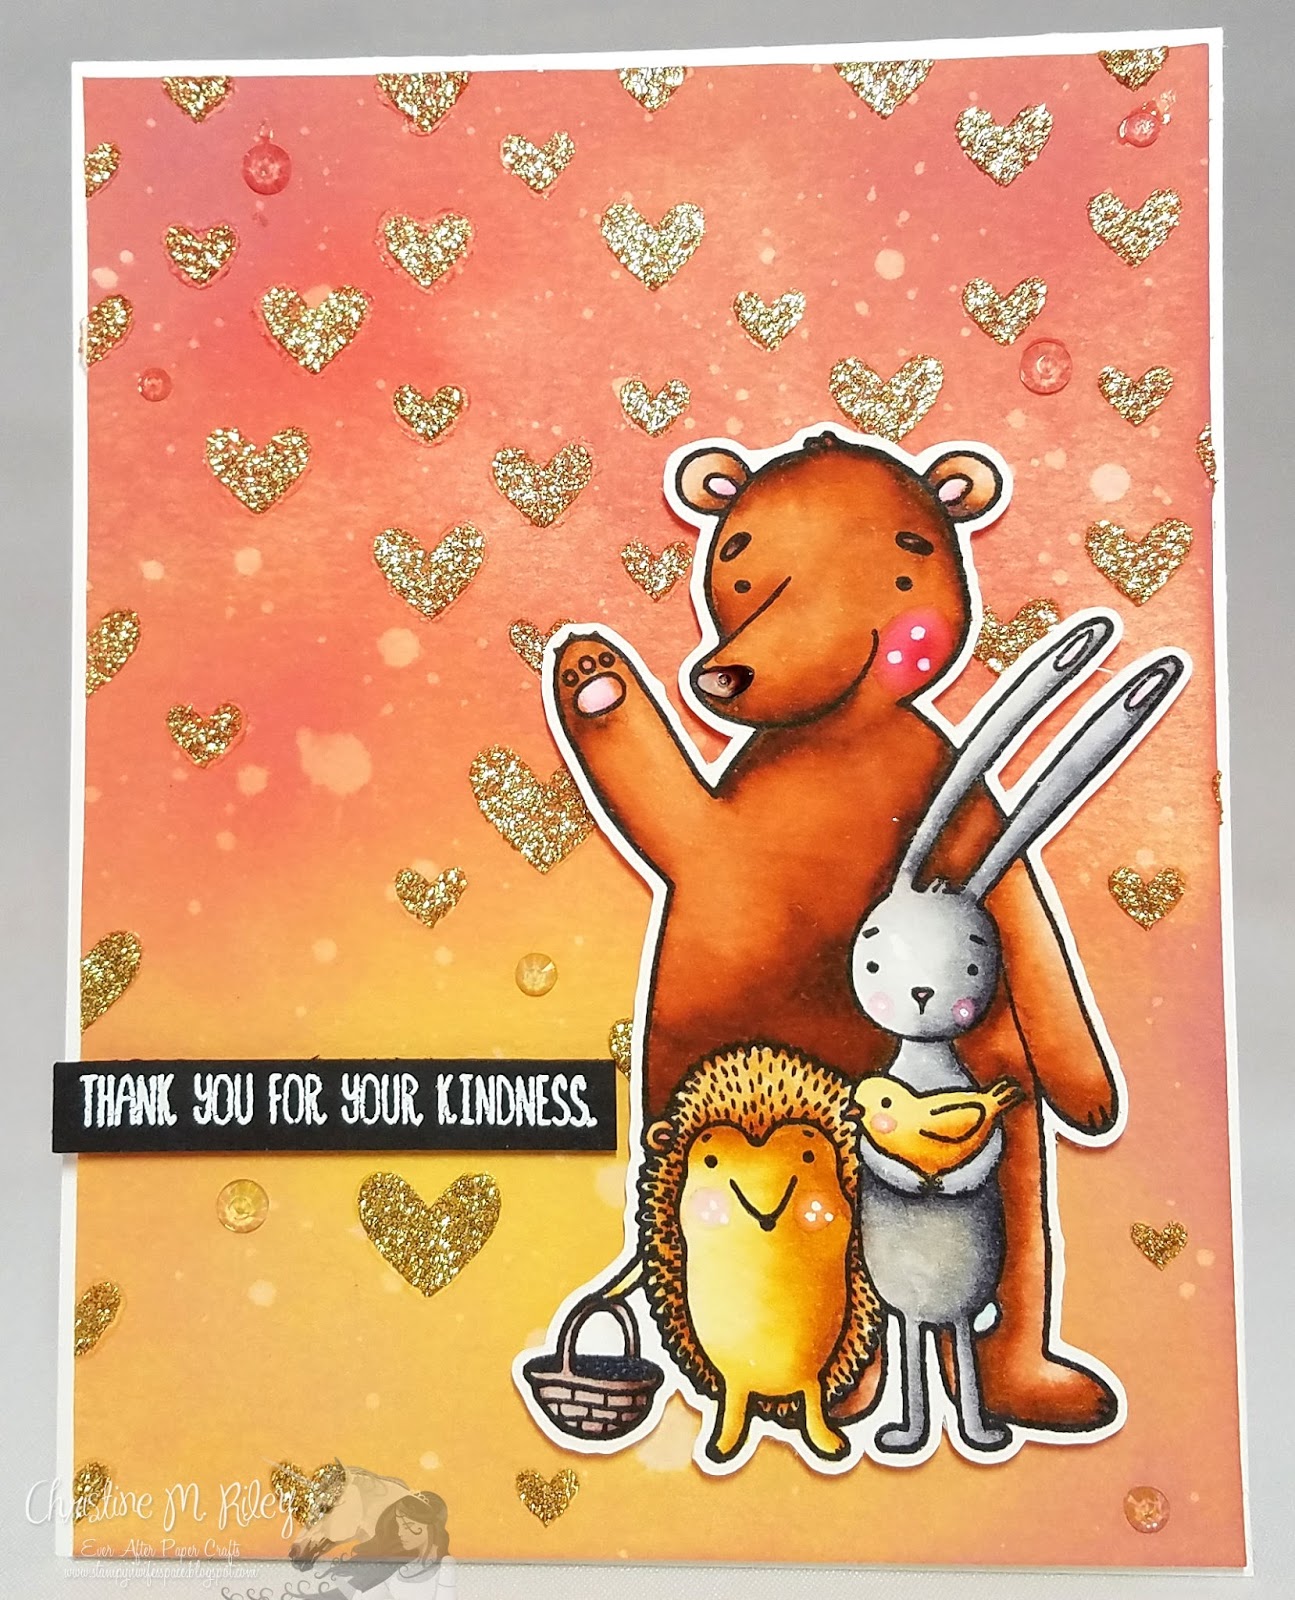
And here are some pictures of my card:
To create today's card, I first created the background. To do that, I inked a piece of Canson XL Watercolor Paper (cut slightly smaller than an A2 sized card base) with Fossilized Amber Distress Oxide Ink, Candied Apple Distress Oxide Ink, and Fired Brick Distress Oxide Ink. I then spritzed some water from my Distress Sprayer onto the panel and then let it dry. Next, I used a heart stencil from my stash and applied some Gold Glitter Paste to the stencil, which resulted in the beautiful gold hearts you see on the panel. Next, I stamped the Forest Friends Stamp Set from Honey Bee Stamps onto some Canson XL Watercolor paper and then painted the image with my Zig Markers and my Detailer Water Brush. I used the following Zig Markers:
Bear: Dark Brown, Brown, Light Pink, Pink (for cheek), and Black
Hedgehog: Brown, Light Brown, Light Pink
Basket: Light Brown, Cornflower Blue
Bunny: Gray, Light Gray, Light Pink, Light Blue (For slight shadow on tail)
Bird: Brown, Yellow, Orange (for beak) and Light Pink
I then cut the image out using the Coordinating Forest Friends Honey Cut Dies and then adhered it to my distressed panel with foam tape. Next, I stamped the sentiment with Versamark Ink onto some black cardstock and embossed it with white embossing powder. I then cut it out and adhered it with foam tape. I then adhered the entire panel to a standard A2 sized card base. What do you think?
Thanks so much as always for stopping by. Have a wonderful day!
Unless otherwise stated all content is by Christine Riley. Please do not copy my work for submission for publication or contests. However, please feel free to copy/lift my cards or layouts for your own personal use. Thanks so much.